| 일 | 월 | 화 | 수 | 목 | 금 | 토 |
|---|---|---|---|---|---|---|
| 1 | ||||||
| 2 | 3 | 4 | 5 | 6 | 7 | 8 |
| 9 | 10 | 11 | 12 | 13 | 14 | 15 |
| 16 | 17 | 18 | 19 | 20 | 21 | 22 |
| 23 | 24 | 25 | 26 | 27 | 28 |
- 한달브런치북만들기
- 캐치마인드
- 브런치작가되기
- 리얼하다
- 커스텀린트
- 프래그먼트
- 테트리스
- 슬기로운 온라인 게임
- 면접
- 1일1커밋
- 좌식테이블
- 지지않는다는말
- 어떻게 나답게 살 것인가
- 끝말잇기
- 아비투스
- 안드로이드
- 함수형 프로그래밍
- 베드테이블
- 재택근무
- 자취필수템
- T자형인재
- 한달독서
- 목적중심리더십
- 한단어의힘
- 소프시스
- 목적 중심 리더십
- 소프시스 밤부 좌식 엑슬 테이블
- 북한살둘레길
- 한달어스
- 베드트레이
- Today
- Total
정상에서 IT를 외치다
[Android, RecyclerView] 리사이클러 뷰 만들기 본문
안녕하세요. 블랙진입니다.
이번 시간부터 안드로이드 리사이클러뷰에 관해 단계별로 포스팅을 하겠습니다.
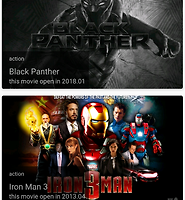
그 첫번 째 시간으로 아래와 같은 리사이클러뷰를 만들어 보겠습니다.
0. package 준비
1. app 단계의 build.gradle 추가
implementation 'com.android.support:appcompat-v7:28.0.0-rc02'
implementation "com.android.support:recyclerview-v7:28.0.0-rc02"
implementation "com.android.support:cardview-v7:28.0.0-rc02"

implementation "com.github.bumptech.glide:glide:3.7.0"
recyclerView, cardView, glide 3가지 라이브러리를 추가해줍니다
이때 recyclerView, cardView 의 버전 '28.0.0-rc02' 는 본인의 support:appcompat-v7 의 버전과 동일하게 설정해 줍니다.
ex) 만약 본인의 support:appcompat-v7:27.1.1 이면 아래와 같이 설정해주시면 됩니다.
implementation 'com.android.support:appcompat-v7:27.1.1'
implementation "com.android.support:recyclerview-v7:27.1.1"
implementation "com.android.support:cardview-v7:27.1.1"

implementation "com.github.bumptech.glide:glide:3.7.0"
2. 인터넷 접근 권한 설정
AndroidManifest.xml
<uses-permission android:name="android.permission.INTERNET" />
이미지는 서버로 부터 받아올 예정입니다.
이에 AndroidManifest 상단에 인터넷 접근 권한을 설정해 줍니다.
아래는 사용할 이미지 주소입니다. 모두 구글 이미지 검색을 통해 얻은 주소입니다:)
3. activity_main.xml , item_movie.xml 을 준비해 줍니다.
activity_main.xml
<?xml version="1.0" encoding="utf-8"?>
<android.support.constraint.ConstraintLayout
    xmlns:android="http://schemas.android.com/apk/res/android"
    xmlns:tools="http://schemas.android.com/tools"
    android:layout_width="match_parent"
    android:layout_height="match_parent"
    tools:context=".MainActivity">

    <android.support.v7.widget.RecyclerView
        android:id="@+id/recycler_view"
        android:layout_width="match_parent"
        android:layout_height="wrap_content"/>

</android.support.constraint.ConstraintLayout>
item_movie.xml
<?xml version="1.0" encoding="utf-8"?>
<FrameLayout
    xmlns:android="http://schemas.android.com/apk/res/android"
    xmlns:app="http://schemas.android.com/apk/res-auto"
    android:layout_width="match_parent"
    android:layout_height="wrap_content">

    <android.support.v7.widget.CardView
        android:id="@+id/cv_item_movie_parent"
        android:layout_width="match_parent"
        android:layout_height="wrap_content"
        app:cardCornerRadius="4dp"
        app:cardUseCompatPadding="true"
        app:cardElevation="4dp">

        <ImageView
            android:id="@+id/iv_item_movie"
            android:scaleType="centerCrop"
            android:layout_width="match_parent"
            android:layout_height="240dp" />

        <LinearLayout
            android:layout_width="wrap_content"
            android:layout_height="wrap_content"
            android:layout_gravity="bottom"
            android:paddingLeft="16dp"
            android:paddingRight="8dp"
            android:paddingTop="8dp"
            android:paddingBottom="8dp"
            android:alpha="0.6"
            android:background="@android:color/black"
            android:orientation="vertical">

            <TextView
                android:id="@+id/tv_item_movie_genre"
                android:layout_width="wrap_content"
                android:layout_height="wrap_content"
                android:layout_marginBottom="8dp"
                android:text="Movie Genre"
                android:textColor="@android:color/white"
                android:textSize="12dp"/>

            <TextView
                android:id="@+id/tv_item_movie_title"
                android:layout_width="wrap_content"
                android:layout_height="wrap_content"
                android:layout_marginRight="16dp"
                android:text="Title"
                android:textColor="@android:color/white"
                android:textSize="18dp"/>


            <TextView
                android:id="@+id/tv_item_movie_content"
                android:layout_width="wrap_content"
                android:layout_height="wrap_content"
                android:text="Movie Content"
                android:textColor="@android:color/white"/>

        </LinearLayout>

    </android.support.v7.widget.CardView>

</FrameLayout>
4. Movie 데이터를 저장할 객체를 생성해 줍니다.
public class Movie {

    private String url;
    private String genre;
    private String title;
    private String content;

    public Movie(String url, String genre, String title, String content) {

        this.url = url;
        this.genre = genre;
        this.title = title;
        this.content = content;

    }

    public String getUrl() {
        return url;
    }

    public String getGenre() {
        return genre;
    }

    public String getTitle() {
        return title;
    }

    public String getContent() {
        return content;
    }
}
5. Adapter 를 생성해 줍니다.
public class MovieAdapter extends RecyclerView.Adapter<MovieAdapter.ViewHolder> {

    private ArrayList<Movie> items = new ArrayList<>();

    @NonNull
    @Override
    public MovieAdapter.ViewHolder onCreateViewHolder(@NonNull ViewGroup parent, int i) {

        View itemView = LayoutInflater.from(parent.getContext()).inflate(R.layout.item_movie, parent, false);
        ViewHolder viewHolder = new ViewHolder(itemView);

        return viewHolder;
    }

    @Override
    public void onBindViewHolder(@NonNull MovieAdapter.ViewHolder viewHolder, int position) {

        Movie item = items.get(position);

        Glide.with(viewHolder.itemView.getContext())
                .load(item.getUrl())
                .into(viewHolder.ivMovie);

        viewHolder.tvTitle.setText(item.getTitle());
        viewHolder.tvContent.setText(item.getContent());
        viewHolder.tvGenre.setText(item.getGenre());

    }

    @Override
    public int getItemCount() {
        return items.size();
    }

    public void setItems(ArrayList<Movie> items) {
        this.items = items;
    }

    class ViewHolder extends RecyclerView.ViewHolder {

        ImageView ivMovie;
        TextView tvTitle, tvContent, tvGenre;

        ViewHolder(View itemView) {
            super(itemView);

            ivMovie = itemView.findViewById(R.id.iv_item_movie);

            tvTitle = itemView.findViewById(R.id.tv_item_movie_title);
            tvContent = itemView.findViewById(R.id.tv_item_movie_content);
            tvGenre = itemView.findViewById(R.id.tv_item_movie_genre);
        }
    }
}
6. 샘플 데이터를 생성해 줍니다.
public class SampleData {

    ArrayList<Movie> items = new ArrayList<>();

    public ArrayList<Movie> getItems() {

        Movie movie1 = new Movie("http://static.hubzum.zumst.com/hubzum/2018/02/06/09/962ec338ca3b4153b037168ec92756ac.jpg",
                "action", "Black Panther", "this movie open in 2018.01");

        Movie movie2 = new Movie("https://t1.daumcdn.net/cfile/tistory/0138F14A517F77713A",
                "action", "Iron Man 3", "this movie open in 2013.04");

        Movie movie3 = new Movie("https://i.ytimg.com/vi/5-mWvUR7_P0/maxresdefault.jpg",
                "action", "Ant Man", "this movie open in 2015.06");

        items.add(movie1);
        items.add(movie2);
        items.add(movie3);

        items.add(movie1);
        items.add(movie2);
        items.add(movie3);

        items.add(movie1);
        items.add(movie2);
        items.add(movie3);

        return items;
    }
}
7. MainActivity 에서 뷰 초기화 및 어댑터를 연결해 줍니다.
public class MainActivity extends AppCompatActivity {

    private MovieAdapter adapter = new MovieAdapter();

    @Override
    protected void onCreate(@Nullable Bundle savedInstanceState) {
        super.onCreate(savedInstanceState);
        setContentView(R.layout.activity_main);

        //recycleView 초기화
        RecyclerView recyclerView = findViewById(R.id.recycler_view);

        recyclerView.setLayoutManager(new LinearLayoutManager(this));
        recyclerView.setAdapter(adapter);

        //아이템 로드
        adapter.setItems(new SampleData().getItems());

    }
}
1~7 번 까지 코드를 모드 따라 하시면 멋지게 리사이클러뷰를 만드셨을 겁니다.
설명보다는 빠른 구현을 위해 코드 위주로 설명했습니다. 혹시 궁금한 점이나 안되신 점이 있으면 댓글 부탁드리겠습니다.
완성코드 공유 하도록 하겠습니다! 그럼 안뇨옹 :)
<리사이클러뷰에 관한 또 다른 포스팅 gogo ~!>
'안드로이드' 카테고리의 다른 글
| [Android, ItemDecoration] 리사이클러뷰에 아이템데코레이션 사용하기 (2) | 2018.09.19 |
|---|---|
| [Android, RecyclerView] 리사이클러뷰 레이아웃 매니저 종류 (2) | 2018.09.18 |
| [Android, URL Scheme] 외부 스킴 사용하여 앱 실행하기 (9) | 2018.09.17 |
| [Android, realm migration] Realm Migration 적용하기 (0) | 2018.09.14 |
| [Android, Lottie] Lottie 를 사용한 애니메이션 효과 (4) | 2018.09.12 |


